Designing Pluggable AI for Enemies with Unity

State controllers in Unity can quickly get out of hand if you throw the kitchen sink into them. Taking the time to break apart your state machine and crafting pluggable components will make your system testable, flexible, clean, and composable.
Disclaimer: While I’m going to provide examples, not all the implementation details will be explained as this post is meant to exemplify the high level concept of building pluggable AI.
Just Put It In Update
Hint: Don’t do this!
Defining behaviors for entities in Unity is typically done with a StateController that implements Unity’s MonoBehavior class. One approach to controlling a enemy behavior is by defining when to move, how to move, when to shoot, how to shoot, etc. all together in your update() method. As you can probably imagine this approach while maybe not to challenging to implement, it will be very difficult to maintain and understand.
void Update ()
{
  // Move the enemy
  Vector3 destination = controller.wayPointList[controller.nextWayPoint].position;
  while (Vector3.Distance(controller.transform.position, destination) > 0.1f)
  {
    // if the player is detected shot at the player
    if (IsPlayerDetected)
    {
      Debug.unityLogger.Log("Shoot the player.");
      GameObject shotObject = (GameObject)Instantiate(shotPrefab, transform.position + transform.right * 0.5f, transform.rotation);
      shotObject.transform.Rotate(0f, 0f, Random.Range(-spreadOfShots, spreadOfShots));
    }
    Debug.unityLogger.Log("Traveling towards the waypoint");
    controller.transform.position = Vector3.MoveTowards(controller.transform.position, destination,
    controller.sentinelStats.moveSpeed * Time.deltaTime);
  }
  else
  {
    Debug.unityLogger.Log("Incrementing the waypoint");
    controller.nextWayPoint = (controller.nextWayPoint + 1) % controller.wayPointList.Count;
  }

  Vector3 movement = new Vector3 (moveHorizontal, 0.0f, moveVertical);

  rb.AddForce (movement * speed);
}
Yuck. Maybe you can get by with this in a game jam or some small project but in a large scale project you will feel pain.
Refactor You Mess
Hint: Best results occur before Mom has to tell you twice!
A better alternative would be to spilt up behaviors into separate coroutines which are IEnumerators running within the game loop. You will have a much easier time understanding and maintaining these smaller methods especially when you organize them into some logical order.
private IEnumerator Patrol()
{
  while (Vector3.Distance(transform.position, WaypointPositions[_currentWaypoint]) > 0.1f)
  {
    if (Vector3.Angle(transform.right, WaypointPositions[_currentWaypoint] - transform.localPosition) < 1f)
    {
      _rb.velocity = transform.right * Speed;
    }
    else
    {
      _rb.velocity = _rb.velocity * Time.deltaTime;
    }

    RotateTowardsTarget(WaypointPositions[_currentWaypoint]);

    if (IsTargetDetected())
    {
      JumpToShoot();
    }
    yield return null;
  }

  _currentWaypoint++;
  if (_currentWaypoint == WaypointPositions.Length)
  {
    _currentWaypoint = 0;
  }
  StartCoroutine("Scan");
}

private IEnumerator Fire()
{
  WeaponSprite.SetActive(true);
  _spotlight.SetTargetColor(Colors.NomorianOrange);
  _timeOfLastShot = Time.time;
  while (IsPlayerInRange() && !IsPlayerObstructed())
  {
    RotateTowardsTarget(Game.instance.playerContainer.playerPhysics.position);
    if (Time.time > _timeOfLastShot + TimeBetweenShots)
    {
      GameObject shotObject = (GameObject)Instantiate(ShotPrefab, transform.position + transform.right * 0.5f, transform.rotation);
      shotObject.transform.Rotate(0f, 0f, Random.Range(-SpreadOfShots, SpreadOfShots));
      _timeOfLastShot = Time.time;
    }
    yield return null;
  }
  WeaponSprite.SetActive(false);
  StartCoroutine("Scan");
}

private void JumpToFire()
{
  StopAllCoroutines();
  StartCoroutine("Fire");
}
Better. We have some separation now and it’s more clear of what’s happening with our state controller. Still, this is a lot of code that we have to consider and finding your issue or tweaking a behavior can be more tedious than it has to be. Plus, what if we have a several enemies that exhibit some of the same behaviors? It sure would be nice to not rewrite or copy/paste that code all over and balloon up our code base.
Plug And Chug
Hint: Beer and code work well together when they are modular events. Ask me how I know!
The best solution involves a pattern in which you can use pluggable components to turn your state controller into simple building blocks that are simple, modular, testable, flexible, clean, and composable.
To do this let’s think about the core of what components make an enemy. We are going to think about an enemy in 5 different contexts, Data, Actions, States, Decisions, and Transitions.
Data
To keep things clean we will hold all the properties of a enemies in a straight up data class called EnemyStats. These are all descriptive properties of what the enemy is composed of. Things like health and speed.
Actions
Actions are essentially the “verbs” of the enemy. An enemy can Patrol, Shoot, and Chase. This is where most of your implementation and time spent will be held. Later on, we will see how to define these actions.
States
States are well… states! Think of states as an one or two word “present tense” description of the actions of the enemy. For instance, the enemy is in the Patrolling state or the Chasing state.
Decisions
Somehow we have to decide when to change states and start doing some other action. Maybe something is on a timer, or maybe it’s an interaction with the player can changes our behavior. We will see how to implement couple of decisions like PlayerDetected.
Transitions
Once we have made a decision we got to have some way of transitioning to the next action. A transition is simply how we get from “a” to “b”.
Now that we have some definitions and a framework in which to start crafting together an enemy, let’s try to build a simple enemy.
Implementation
Let’s build an enemy that can patrol some waypoints and shoot at the player.
We will start with the most straight forward piece of the puzzle, the Data. At the moment I only care that the enemy have a moveSpeed and a turnSpeed.
[CreateAssetMenu (menuName = "PluggableAI/EnemyStats")]
public class EnemyStats : ScriptableObject
{
  public float moveSpeed = 1f;
  public float turnSpeed = 1f;
}
Because this is ScriptableObject, we can turn this script into a Unity asset and later map it to our state controller.
We have a couple properties for our enemy but it doesn’t do anything yet. Let’s build a couple of actions for patrolling waypoints and shooting a projectile at the player. Let’s create another ScriptableObject called Action and it will be an abstract class with one method taking a StateController as a parameter.
public abstract class Action : ScriptableObject
{
  public abstract void Act(StateController controller);
}
For the PatrolAction we need the enemy to move toward our first waypoint and when it arrives head toward the next one using the moveSpeed we previously set in our EnemyStats class. We will add this to our asset menu as well so that we can create this script as a Unity asset in the Unity menu. Let’s extend our Action class and define a private method called Patrol to do this:
[CreateAssetMenu (menuName = "PluggableAI/Actions/Patrol")]
public class PatrolAction : Action
{
  public override void Act(StateController controller)
  {
    Patrol(controller);
  }

  private void Patrol(StateController controller)
  {
    Debug.unityLogger.Log("Entered the Patrol Action");
    Vector3 destination = controller.wayPointList[controller.nextWayPoint].position;

    if (Vector3.Distance(controller.transform.position, destination) > 0.1f)
    {
      Debug.unityLogger.Log("Traveling towards the waypoint");
      controller.transform.position = Vector3.MoveTowards(controller.transform.position, destination,
      controller.enemyStats.moveSpeed * Time.deltaTime);
    }
    else
    {
      Debug.unityLogger.Log("Incrementing the waypoint");
      controller.nextWayPoint = (controller.nextWayPoint + 1) % controller.wayPointList.Count;
    }
  }
}
Let’s build another action to shoot at the player.
[CreateAssetMenu(menuName = "PluggableAI/Actions/Shoot")]
  public class ShootAction : Action
  {
    public override void Act(StateController controller)
    {
      Shoot(controller);
    }

    private void Shoot(StateController controller)
    {
      controller.enemyStats.timeOfLastShot = Time.time;
      Debug.unityLogger.Log("Shoot the player.");
      GameObject shotObject = (GameObject)Instantiate(controller.shotPrefab, controller.transform.position + controller.transform.right * 0.5f, controller.transform.rotation);
      shotObject.transform.Rotate(0f, 0f, Random.Range(-controller.enemyStats.spreadOfShots, controller.enemyStats.spreadOfShots));
      controller.enemyStats.timeOfLastShot = Time.time;
    }
  }
Somehow the enemy needs to make a Decision to go from patrolling to shooting. We’ll create another abstract class called Decision.
public abstract class Decision : ScriptableObject
{
  public abstract bool Decide(StateController controller);
}
If the player was detected (meaning in sight and range of what our enemy can hit) we will change states. Let’s create a PlayerDetectedDecision that will return true if the player was detected and false if not. Since your detection mechanics may vary, the particular implementation isn’t show here. I’ve created a small static utility class called DetectionUtils for this and some other detection related behavior for ease of reuse.
[CreateAssetMenu(menuName = "PluggableAI/Decisions/PlayerDetected")]
public class PlayerDetectedDecision : Decision
{
  public override bool Decide(StateController controller)
  {
    return PlayerDetected(controller);
  }

  private bool PlayerDetected(StateController controller)
  {
    if (!DetectionUtils.IsTargetDetected(controller.transform)) return false;
    Debug.unityLogger.Log("Player was detected.");
    return true;
  }
}
We now have two actions and a decision that will allow us to Transition from one action to another. We need a simple class to represent a transition that will have three public fields that we will later assign in the Unity editor.
[System.Serializable]
public class Transition
  {
    public Decision decision;
    public State trueState;
    public State falseState;
  }
The last piece of this puzzle before we head into the Unity editor is the notion of State. States can have multiple actions and transitions. We need a way to perform our actions and decide when, if at all, we transition to another action.
[CreateAssetMenu (menuName = "PluggableAI/State")]
public class State : ScriptableObject
{
  public Action[] actions;
  public Transition[] transitions;
  public Color sceneGizmoColor = Color.gray;

  public void UpdateState(StateController controller)
  {
    DoActions(controller);
    CheckTransition(controller);
  }

  private void DoActions(StateController controller)
  {
    foreach (Action action in actions)
    {
      action.Act(controller);
    }
  }

  private void CheckTransition(StateController controller)
  {
    foreach (Transition transition in transitions)
    {
      bool decisionSucceeded = transition.decision.Decide(controller);
      controller.TransitionToState(decisionSucceeded ? transition.trueState : transition.falseState);
    }
  }
}
Now we have everything we need to hook this all up. Over in the unity editor we need to create our action, state, and decision assets.
In the Unity editor, we can right-click within the project window and create two action assets named PatrolAction and ShootAction
Right-Click --> Create --> PluggableAI --> Actions --> Patrol
Right-Click --> Create --> PluggableAI --> Actions --> Shoot
We also need to create our PlayerDetectedDecision asset.
Right-Click --> Create --> PluggableAI --> Decisions --> PlayerDetected
Now create a state asset called Patrolling
Right-Click --> Create --> PluggableAI --> State
I also want a dummy state that doesn’t really do anything that way I can remain in the same state I’m already in. Create a state asset called RemainState
Right-Click --> Create --> PluggableAI --> State

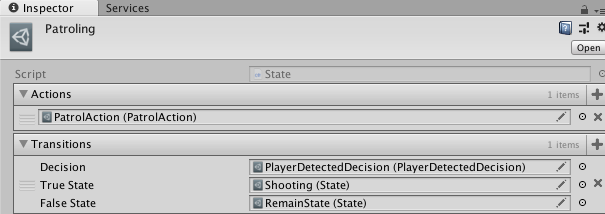
Click on our Patrolling asset in the project window and you’ll notice in the Inspector we can add Actions and Transitions. First add an action and pick our PatrolAction asset from the available action assets. Then add a Transition with the PlayerDetectedDecision, set the true state to Shooting and the false state to RemainState.

Now create a state asset called Shooting
Right-Click --> Create --> PluggableAI --> State
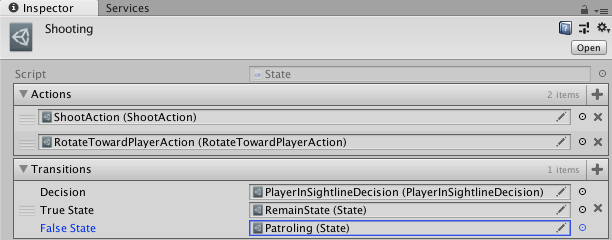
Click on our Shooting and in the Inspector add an action and pick our ShootAction asset from the available action assets. Set the decision to the PlayerDetectedDecision and the true state to RemainState and the false to Patroling. (For my personal implementation, I want to only shoot if the player is with what I call a “sightline”. Basically, the player is in range and the view is not obstructed by terrain.)

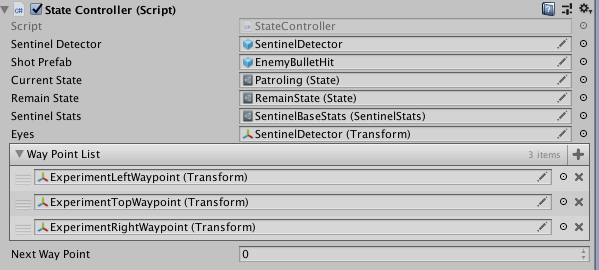
Lastly, we need to setup our enemy’s StateController. Simply set the the current and remain states along with the other fields you need.

That’s it! You have created a Pluggable AI system! You may have noticed in the last screen shot that I have two actions for the Shooting state: the ShootAction and the RotateTowardPlayerAction. This is what I mean by composable. The Shooting state not only shoots a projectile toward the player, the enemy will rotate toward the player at the same time. These leads to more possibilities such as running sprite animations, toggling colliders, and much more. I hope you found this helpful and at the very least interesting and I wish you best of luck on your Unity project. Game On!
